Terrascope logoProba-V MEP logo
The FAQ applies to Terrascope and Proba-V MEP. Please note that the FAQ is in English only.

Frequently asked questions

Services

How to use the OGC WCS service?

This service is currently unavailable

Virtual Machines

How to enable file sharing for your User VM?

X2GO also provides file sharing support between your own PC and the User VM. On the 'Shared folders' tab, add the local folder(s) you want to become available in your User VM.

Typically, you will want the folder to become available when the X2GO session is started. In that case, select the 'automount' option.

The local folder will be mounted using Fuse. The hard part is to locate the folder on the User VM on which the local folder is mounted. The easiest way to find out is to run the following command on the User VM:

[daemsd@daemsdvm ~]$ mount | grep x2go
dirkd@127.0.0.1:/home/dirkd/Documents on /tmp/.x2go-daemsd/media/disk/_home_dirkd_Documents type fuse.sshfs (rw,nosuid,nodev,relatime,user_id=30320,group_id=631600014,default_permissions)

This shows that the folder is mounted on /tmp/.x2go-daemsd/media/disk/_home_dirkd_Documents.

Note: the Windows X2GO client seems to generate the wrong type of SSH keys during installation (DSA iso RSA). If you experience problems to get filesharing support on Windows working this could be the cause. You can fix this by copying the DSA keys under C:\Users\<username>\.x2go\etc and replacing 'dsa' by 'rsa' in the filename. If you still experience problems, you can try to uninstall X2GO, remove the .x2go folder in your home directory and install the latest X2GO version. During the installation make sure you enable the debug output option. X2GO can now be started in debug mode, providing detailed log messages which are useful for us to resolve your problem.

How to manage user defined Aliases and Environment Variables?

Since the ~/.bashrc file is automatically managed, changes to this file will be reset.

To make sure users can still create aliases or set environment variables there is a file ~/.user_aliases which can be used for this reason. If this file doesn't exist yet, it can be created.

How to request a new Terrascope VM?

Note that you need to be signed in on the Terrascope portal using your Terrascope account to request an OpenStack Virtual Machine (VM).

After receiving your request for a VM, the Terrascope team will validate your request and provide you feedback within two working days and a VM when your request is granted.

You will receive an e-mail explaining how to access your personal VM.

Your VM with standard configuration (4 CPU,8GB RAM, 4GB SWAP, 80GB Root Disk) will be provided for free. If for specific projects or operational services more resources are needed in terms of CPU, RAM or storage, please do not hesitate to contact us at info@terrascope.be to see how we can further help you achieving your goals.

The Terrascope VM runs on the OpenStack private cloud hosted by VITO.

How to access your VM is explained in the following videos.

What is a user virtual machine?

With the user Virtual Machine (VM), a developer or researcher can access a Virtual Research Environment with access to the complete Terrascope data archive and a powerful set of tools and libraries to work with the data (e.g. SNAP toolbox, GRASS GIS, QGIS) or to develop-debug test applications (R, Python or Java).

The user Virtual Machine:

  • comes with several pre-installed commandline tools, desktop applications and developer tools which are useful for exploitation of  the data available in Terrascope  (e.g. GDAL, QGIS, GRASS GIS, SNAP, Python, etc ...).
  • provides access to the full Terrascope EO data archive. 
  • targets an audience of scientists and developers developing applications which use Terrascope EO data. After the prototyping phase, the Terrascope processing environment can be used for larger scale processing.

What are the costs for a Terrascope VM?

Your VM with standard configuration (4 CPU,8GB RAM, 4GB SWAP, 80GB Root Disk) can be provided for free.

If for specific projects or operational services more resources are needed in terms of CPU, RAM or storage, pleasse do not hesitate to contact VITO to see how we can further help you achieving your goals.

How to access your Terrascope VM?

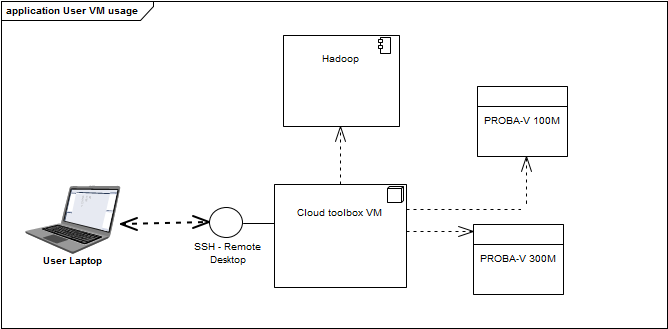
There are two ways to get access to your Terrascope VM: either by accessing the graphical desktop of your VM, or through the command line.

Graphical access is the easiest option if you are not comfortable with using a Linux terminal, but requires a stable and reasonably fast internet connection to the Terrascope cloud.

You can sign in using your Terrascope portal account. Make sure you use lowercase characters for your username: e.g. 'Username90' should be transformed to 'username90'.


How to access your VM is explained in the following videos.


Commandline access

Commandline access is provided though SSH. Download and install an SSH client (e.g. PuTTY for a Windows OS) if needed.

On Linux you can use the command: ssh -p port username@uservm.terrascope.be

If your ssh connection gets terminated or 'hangs' after a while of not using the connection, a fix could be to make a change in your local ssh settings.

By adding the 'ServerAliveInterval 60' to your ssh config and restarting your ssh daemon, the client will send a null packet to the server every 60 seconds to keep the connection alive. The '60' in the line is the amount of time in between each null packet.

Desktop access

The following steps are required to access the desktop

X2Go client installation

Download and install the X2Go client program for your operating system, as described here: http://wiki.x2go.org/doku.php/doc:installation:x2goclient

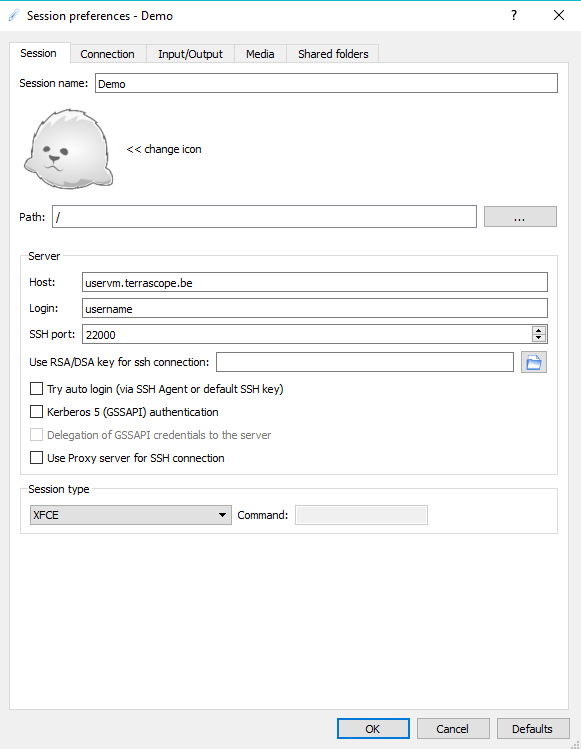
Create Toolbox VM session

Start the X2Go client and create a new session. The host, and ssh port is provided to you when requesting a new toolbox. The login and password is the same as for the Terrascope portal.

Make sure to select 'XFCE' as the session type at the bottom of the window. Other sessions types will not work unless you install them manually. XFCE is a lightweight desktop environment, which is suitable for use on virtual machines.

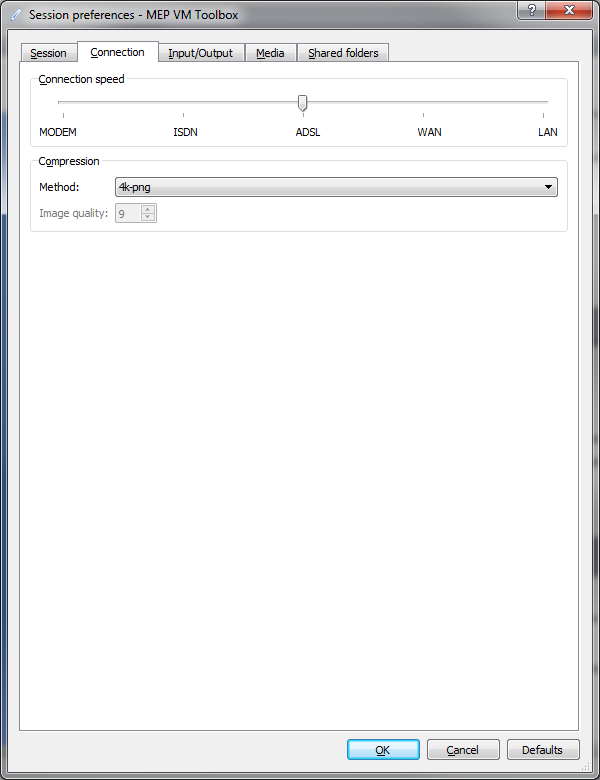
Also change the compression method to '4k-png' on the 'Connection' tab:

When this is done, you can click on Ok, and should be able to log into your VM. When successful, you end up in a desktop environment that looks like this:

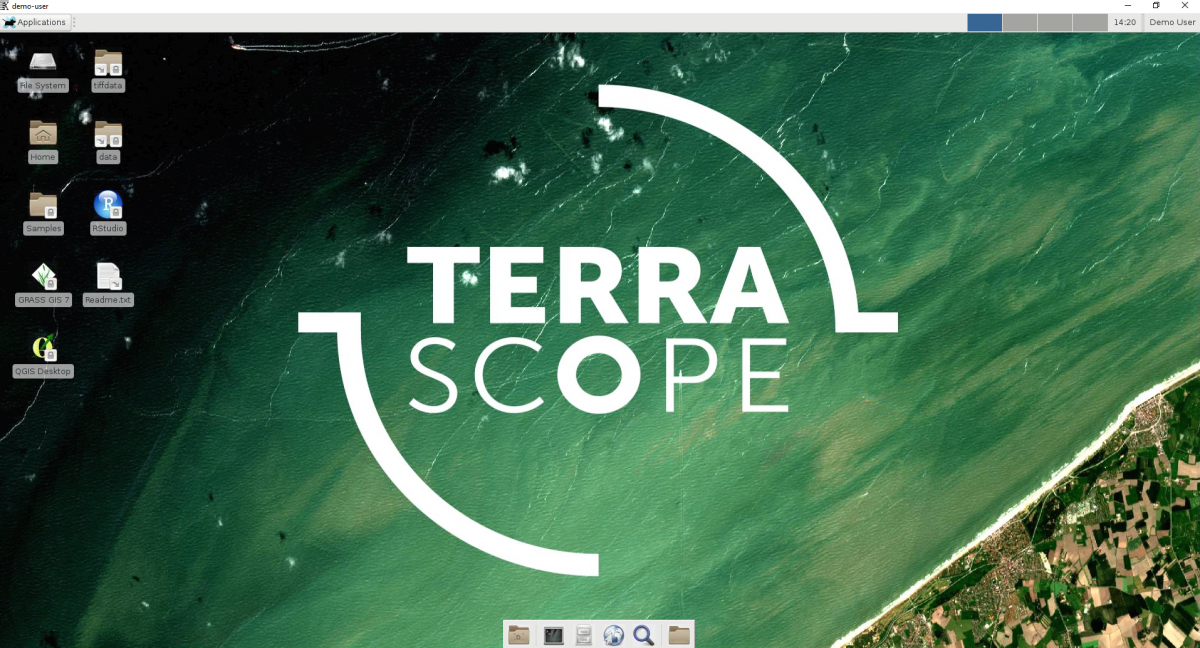
The 'data' folder links to the entire Terrascope EO archive. The 'tiffdata' links to all the tiff files.


What is the VM backup policy?

Your user virtual machine is not backed up!

In line with other cloud environments, virtual machines should not be regarded as being persistent. This means that all data in your home directory and other system directories may be lost in case of a system failure.

To solve this, here are some suggestions:

  • Use version control for anything really important.
  • Use the 'Public' and 'Private' folder in your home directory, these are on a shared filesystem that is more persistent than regular folders, but also do not have snapshots. So if you remove or break a file, it would still be lost.
stay up to date!
subscribeto our newsletter
new perspectives

Stay up to date!